Embark on an informative journey into the world of G Body rear disc brake conversion, where we’ll delve into its benefits, compatibility, components, installation, and more. This comprehensive guide will empower you with the knowledge and confidence to transform your G Body’s braking system, unlocking enhanced performance, reduced maintenance, and heightened safety.
Get ready to experience a braking system that delivers superior stopping power, improved modulation, and a smoother, more responsive feel.
Understanding the Benefits of G Body Rear Disc Brake Conversion
Converting from drum brakes to disc brakes on your G body offers numerous advantages that can significantly enhance your driving experience and safety. Here’s an overview of the key benefits:
Improved Braking Performance
- Disc brakes provide superior stopping power compared to drum brakes due to their larger surface area and more efficient design.
- They dissipate heat more effectively, reducing fade and maintaining consistent braking performance even during prolonged or heavy braking.
- Disc brakes are less prone to locking up, providing greater control and stability during emergency braking situations.
Reduced Maintenance
- Disc brakes require less frequent maintenance than drum brakes.
- The pads are easier to replace and can be visually inspected for wear without disassembling the brake assembly.
- Disc brakes are less susceptible to contamination from dirt and debris, which can reduce the need for cleaning and adjustment.
Enhanced Safety
- The superior braking performance of disc brakes provides increased stopping power in critical situations.
- They offer better resistance to heat buildup, ensuring consistent braking even in extreme conditions.
- Disc brakes are less likely to fail catastrophically, reducing the risk of sudden loss of braking power.
Compatibility and Considerations
The G Body rear disc brake conversion is compatible with a wide range of G Body models and years. These include:
- Chevrolet Monte Carlo (1978-1988)
- Chevrolet Malibu (1978-1983)
- Chevrolet El Camino (1978-1987)
- Buick Regal (1978-1987)
- Oldsmobile Cutlass (1978-1988)
- Pontiac Grand Prix (1978-1987)
When performing the conversion, it is important to consider the following factors:
Wheel Size
The size of the wheels can affect the compatibility of the brake conversion. Larger wheels may require spacers or modifications to the brake calipers to ensure proper fitment.
Suspension Setup
The suspension setup can also impact the conversion. If the vehicle has been lowered or modified, it may be necessary to adjust the brake lines or use different mounting brackets.
Brake Line Routing
The brake line routing may need to be modified to accommodate the new disc brakes. This may involve running new brake lines or using different fittings.
Components and Parts Selection
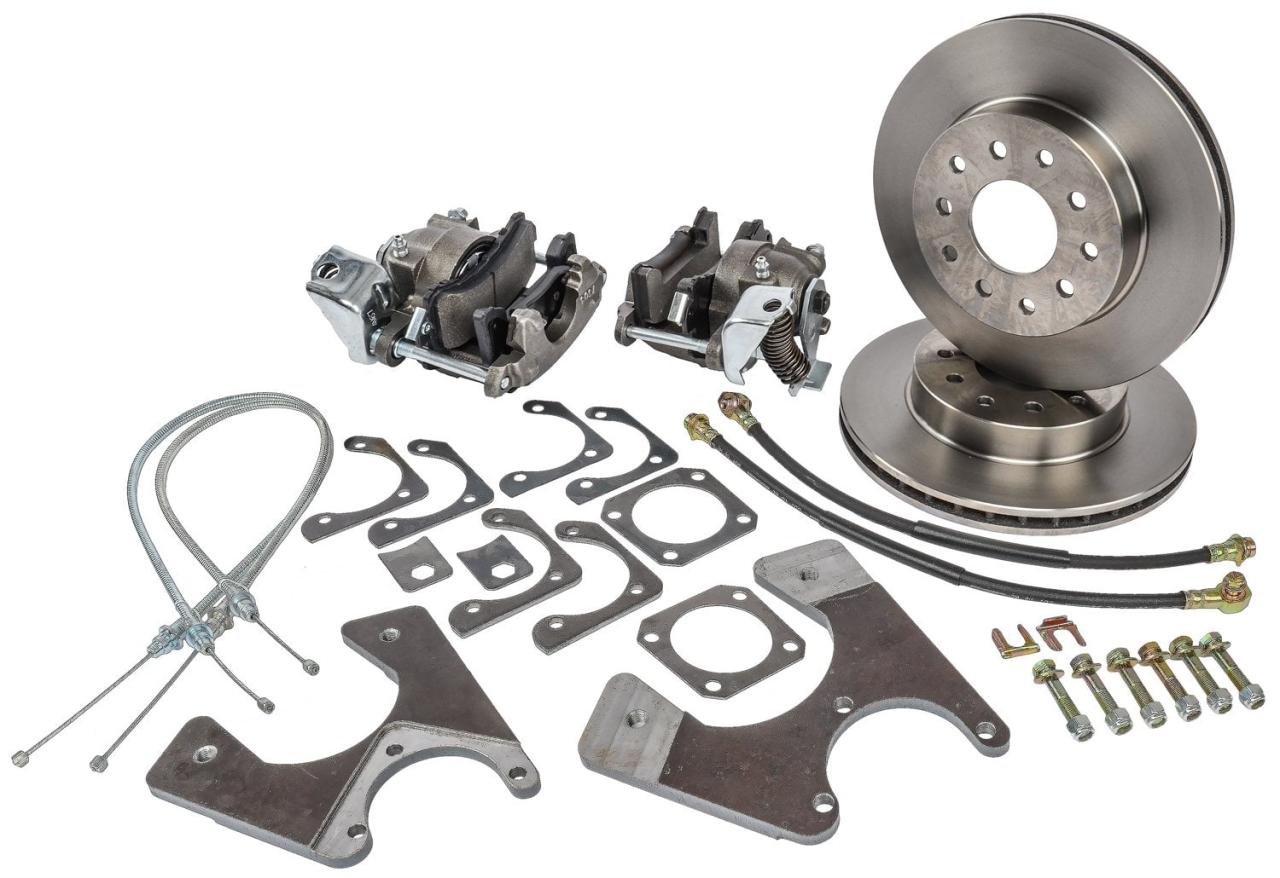
The successful conversion of your G body to rear disc brakes requires careful selection of high-quality components. Here’s a comprehensive list of essential parts you’ll need:
To ensure optimal performance and durability, consider the following recommendations when choosing components:
Brake Calipers
- Select calipers specifically designed for G body rear disc brake conversions.
- Opt for calipers with a lightweight and durable construction, such as aluminum or forged steel.
- Consider calipers with multiple piston configurations to distribute braking force evenly.
Rotors
- Choose rotors with the correct diameter and thickness to fit your G body’s axle.
- Select rotors made from high-quality materials like cast iron or stainless steel.
- Consider slotted or drilled rotors for improved heat dissipation and reduced brake fade.
Brake Pads
- Select brake pads compatible with the calipers and rotors you choose.
- Consider pads with different friction materials to meet specific performance requirements, such as ceramic for low noise and reduced dust or semi-metallic for increased stopping power.
- Choose pads with a high temperature rating to withstand the heat generated during braking.
Mounting Hardware
- Obtain all necessary mounting hardware, including bolts, nuts, and brackets.
- Ensure the hardware is made from high-quality materials and is compatible with the components you’ve selected.
- Use threadlocker or anti-seize compound on all threaded connections for added security.
Step-by-Step Installation Guide: G Body Rear Disc Brake Conversion

Converting your G-body’s rear drum brakes to disc brakes requires careful planning and execution. Here’s a detailed step-by-step guide to help you navigate the process:
Safety First:Before starting, ensure you have the necessary tools, a safe workspace, and wear appropriate safety gear like gloves and eye protection.
Removing the Old Drum Brakes, G body rear disc brake conversion
- Park the vehicle on a level surface and engage the parking brake.
- Loosen the lug nuts on the rear wheels, then lift the rear end using a jack and support it with jack stands.
- Remove the rear wheels.
- Disconnect the brake line from the wheel cylinder by loosening the brake line nut.
- Remove the cotter pin from the brake shoe hold-down pin and pull out the pin.
- Remove the brake shoes and springs.
- Remove the wheel cylinder by unbolting it from the backing plate.
- Remove the backing plate by unbolting it from the axle housing.
Installing the New Disc Brake Components
- Clean the axle housing flange and apply a thin layer of brake cleaner to remove any dirt or debris.
- Install the new brake rotor onto the axle housing flange and tighten the lug nuts.
- Install the caliper bracket onto the axle housing using the supplied bolts.
- Install the brake caliper onto the caliper bracket and tighten the caliper bolts.
- Install the brake pads into the caliper.
- Connect the brake line to the caliper using a new banjo bolt and crush washer.
- Bleed the brake system to remove any air from the lines.
Final Checks and Adjustments
- Double-check all bolts and connections to ensure they are properly tightened.
- Install the rear wheels and tighten the lug nuts.
- Lower the vehicle and remove the jack stands.
- Pump the brake pedal several times to build up brake pressure.
- Test drive the vehicle cautiously, checking for any unusual noises or vibrations.
Bleeding and Adjustment
After the conversion, it’s crucial to properly bleed the brake system to eliminate any trapped air that can lead to spongy pedal feel and reduced braking performance.
Use a brake bleeder kit to connect a hose from the bleeder screw on each caliper to a container filled with brake fluid. Starting with the caliper furthest from the master cylinder, open the bleeder screw slightly and pump the brake pedal several times to force out any air bubbles.
Close the bleeder screw and repeat the process for the remaining calipers, following a specific bleeding sequence as recommended in the service manual.
If you’re looking for a brake chamber that delivers exceptional stopping power, consider the 30 30 short stroke brake chamber . Its compact design and short stroke length make it ideal for tight spaces and provide quick and responsive braking.
Adjusting Brake Pedal Height
Once the system is bled, adjust the brake pedal height for optimal braking performance. Use a wrench to turn the pushrod connecting the brake pedal to the master cylinder. Shortening the pushrod raises the pedal, while lengthening it lowers the pedal.
Adjust the height so that the pedal is level with the accelerator pedal when fully depressed.
The tow-pro liberty electric brake controller is an excellent choice for those who want to upgrade their towing setup. It offers precise and reliable braking control, ensuring a smooth and safe towing experience. The unit is easy to install and can be customized to match your specific needs.
Troubleshooting and Maintenance

The G body rear disc brake conversion is generally a straightforward process, but like any modification, it’s essential to be aware of potential issues and maintenance requirements to ensure optimal performance and safety.
Troubleshooting
Here are some common problems that may arise during or after the conversion:
- Brake Noise:This can be caused by various factors, such as worn brake pads, contaminated brake rotors, or improperly adjusted calipers.
- Vibration:If you experience vibration during braking, it could indicate warped brake rotors or an imbalance in the brake system.
- Poor Pedal Feel:A spongy or unresponsive brake pedal may be due to air in the brake lines, a faulty master cylinder, or a leak in the brake system.
Maintenance
To ensure long-term performance and safety, it’s crucial to establish a regular maintenance schedule for your G body rear disc brake system. This includes:
- Regular Brake Inspection:Check the brake pads, rotors, and calipers for wear or damage. Replace components as necessary.
- Brake Fluid Flush:Brake fluid absorbs moisture over time, which can compromise its effectiveness. Flush the brake fluid every 2-3 years.
- Caliper Lubrication:Lubricate the caliper slide pins and guide bolts to prevent seizing and ensure smooth operation.
Case Studies and Examples

Real-world conversions of G Body vehicles to rear disc brakes have proven successful, delivering significant improvements in braking performance. Here are a few case studies:
Case Study 1: 1987 Buick Regal
A 1987 Buick Regal underwent a rear disc brake conversion using components from a 1994 Chevrolet Impala SS. The conversion involved replacing the original drum brakes with disc brake calipers, rotors, and pads. After the conversion, the vehicle experienced a noticeable reduction in stopping distance and improved pedal feel.
Case Study 2: 1984 Oldsmobile Cutlass
A 1984 Oldsmobile Cutlass received a rear disc brake conversion using aftermarket components. The conversion included Wilwood disc brake calipers, slotted rotors, and high-performance brake pads. The result was a substantial increase in braking power and reduced brake fade during aggressive driving.
Case Study 3: 1986 Pontiac Grand Prix
A 1986 Pontiac Grand Prix owner performed a rear disc brake conversion using a combination of factory and aftermarket components. The conversion involved installing disc brake calipers from a 1991 Chevrolet Caprice and using aftermarket rotors and brake pads. The vehicle exhibited improved braking performance and enhanced stability during cornering.
Visual Aids and Diagrams
To enhance understanding and provide a clear visual representation of the G Body rear disc brake conversion process, illustrative diagrams and schematics are essential.
These visual aids will include detailed images of the components involved, step-by-step installation instructions, and any necessary modifications. By organizing these aids in an HTML table format, we can ensure easy reference and a structured approach to the conversion.
Diagrams and Schematics
The following table provides a comprehensive list of diagrams and schematics to assist in the conversion process:
| Diagram | Description |
|---|---|
| Rear Axle Assembly Diagram | Illustrates the components of the rear axle assembly, including the brake lines, calipers, and rotors. |
| Brake Line Routing Diagram | Shows the proper routing of the brake lines from the master cylinder to the rear calipers. |
| Caliper Mounting Diagram | Provides detailed instructions on how to mount the calipers to the rear axle. |
| Rotor Installation Diagram | Illustrates the correct way to install the rotors onto the rear axle. |
| Parking Brake Adjustment Diagram | Shows how to adjust the parking brake after the conversion. |
Summary
With a G Body rear disc brake conversion, you’ll not only elevate your driving experience but also increase the value and longevity of your vehicle. Embrace this transformative upgrade and witness the remarkable difference it makes in your G Body’s performance and safety.
Q&A
What are the primary advantages of converting to disc brakes?
Disc brakes offer superior braking performance due to their increased friction surface area, improved heat dissipation, and resistance to fade. They also require less maintenance compared to drum brakes.
Is this conversion compatible with all G Body models and years?
Compatibility varies depending on the specific G Body model and year. Consult the detailed guide for a comprehensive list of compatible vehicles.
What components are essential for this conversion?
The conversion typically requires brake calipers, rotors, pads, mounting hardware, and potentially brake lines and proportioning valves.
How difficult is the installation process?
The installation process can be complex and requires mechanical knowledge. It’s recommended to seek professional assistance if you’re not confident in performing the conversion yourself.


