Prepare to immerse yourself in the world of Sterling 10.25 disc brake conversions! This comprehensive guide delves into the depths of this innovative upgrade, empowering you with knowledge that will transform your braking experience.
Discover the advantages of disc brakes, their compatibility with various vehicles, and the essential components that make up the conversion kit. Our step-by-step installation guide ensures a seamless process, while our troubleshooting tips and maintenance schedule will keep your disc brakes in peak condition.
Overview of Sterling 10.25 Disc Brake Conversion
The Sterling 10.25 disc brake conversion is a comprehensive upgrade that replaces the original drum brakes with high-performance disc brakes. This conversion enhances braking performance, reduces maintenance, and improves overall vehicle safety.
Converting to disc brakes offers several advantages over drum brakes. Disc brakes provide superior stopping power, as they generate more friction between the brake pads and rotors. They also dissipate heat more efficiently, reducing brake fade during prolonged use. Additionally, disc brakes are less prone to contamination and wear, resulting in longer service intervals and lower maintenance costs.
Compatibility
The Sterling 10.25 disc brake conversion is compatible with a wide range of Ford vehicles, including the F-150, F-250, and F-350. It is specifically designed for vehicles equipped with the 10.25-inch rear axle. Before purchasing and installing the conversion kit, it is essential to verify compatibility with the specific vehicle model and year.
Components of the Sterling 10.25 Disc Brake Conversion Kit
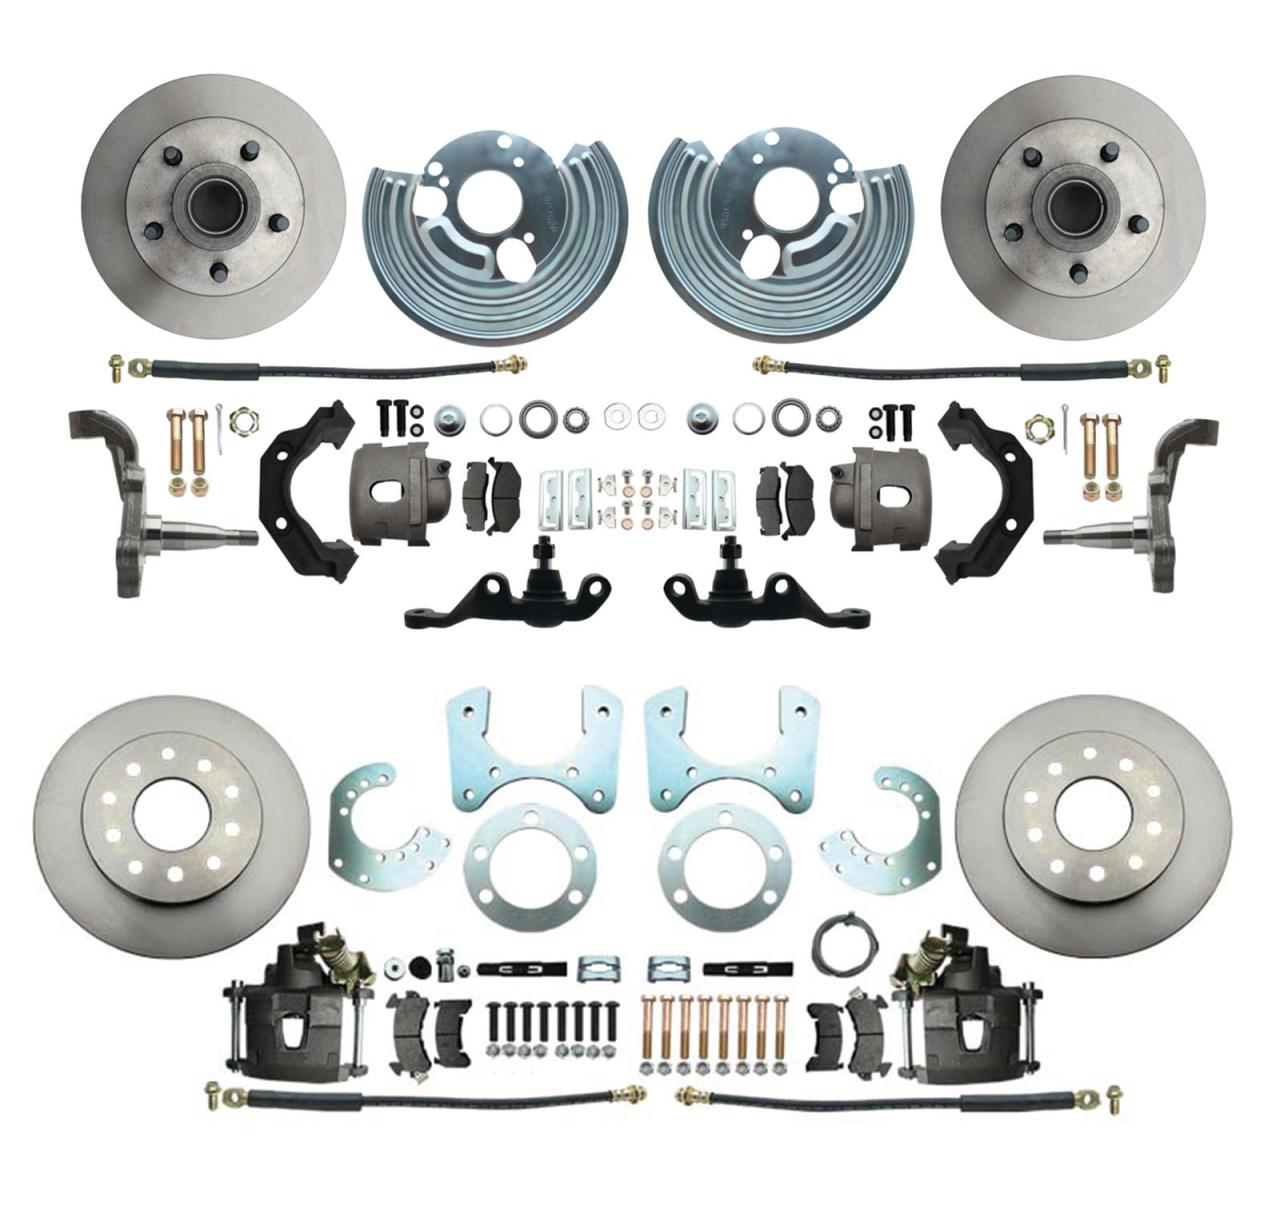
The Sterling 10.25 disc brake conversion kit includes all the essential components needed to upgrade your vehicle’s drum brakes to more efficient and reliable disc brakes. These components are meticulously engineered to work together seamlessly, ensuring optimal braking performance.
The kit comprises the following key components:
Brake Calipers
- Function:Houses the brake pads and applies hydraulic pressure to engage them against the brake rotors, generating friction to slow or stop the vehicle.
- Specifications:Made from lightweight aluminum, featuring a durable anodized finish to resist corrosion. Designed with high-temperature seals and stainless steel pistons for extended longevity.
Brake Rotors
- Function:Provides a friction surface for the brake pads to contact and dissipate heat generated during braking.
- Specifications:Constructed from high-carbon iron for optimal heat dissipation and durability. Precision-machined to ensure a smooth and consistent braking surface.
Brake Pads
- Function:Generate friction when pressed against the brake rotors, converting kinetic energy into heat and slowing or stopping the vehicle.
- Specifications:Typically made from a semi-metallic compound, offering a good balance of performance, durability, and low noise levels.
Brake Lines
- Function:Transfers hydraulic fluid from the master cylinder to the brake calipers, creating the pressure necessary to engage the brake pads.
- Specifications:Made from high-pressure stainless steel to withstand the extreme pressures generated during braking. DOT-compliant for safety and reliability.
Mounting Brackets
- Function:Securely mounts the brake calipers to the vehicle’s suspension, ensuring proper alignment and functionality.
- Specifications:Fabricated from durable steel, providing a rigid and stable base for the brake calipers.
Hardware Kit
- Function:Includes all necessary bolts, nuts, washers, and clips for a complete and secure installation.
- Specifications:Made from high-quality materials to ensure longevity and corrosion resistance.
Installation Process for the Sterling 10.25 Disc Brake Conversion
Installing a disc brake conversion kit on your Sterling 10.25 axle is a straightforward process that can be completed in a few hours with the right tools and preparation. Here’s a step-by-step guide to help you through the installation:
Safety Precautions, Sterling 10.25 disc brake conversion
Before starting any work, ensure you have all the necessary safety gear, including gloves, safety glasses, and a sturdy jack and jack stands. Park your vehicle on a level surface and engage the parking brake.
Tools and Equipment
Gather the following tools and equipment:
- 1/2-inch impact wrench or ratchet
- 1/2-inch sockets (10mm, 13mm, 15mm, 18mm, 21mm)
- Torque wrench
- Caliper spreader
- Brake cleaner
- Anti-seize compound
- Brake fluid
- Bleeder wrench
Step-by-Step Installation Guide
Step 1: Remove the Stock Drum Brakes
Using a 1/2-inch impact wrench or ratchet, remove the bolts holding the drum brakes in place. Pull the drums off the axle and set them aside.
Step 2: Install the Rotors
Apply anti-seize compound to the hub surface where the rotors will be mounted. Slide the rotors onto the axle and tighten the lug nuts to 100 ft-lbs using a torque wrench.
Step 3: Install the Calipers
Use a caliper spreader to compress the pistons on the calipers. Slide the calipers over the rotors and secure them with the provided bolts. Tighten the bolts to 150 ft-lbs.
Step 4: Install the Brake Lines
Connect the brake lines to the calipers. Use a wrench to tighten the fittings securely.
Step 5: Bleed the Brakes
Using a bleeder wrench, open the bleeder screw on each caliper. Pump the brake pedal until clear brake fluid flows out. Close the bleeder screws and top off the brake fluid reservoir.
Step 6: Check for Leaks
Start the engine and check for any leaks in the brake lines or calipers. If any leaks are found, tighten the fittings or replace the damaged components.
Benefits and Performance Improvements after Conversion
Converting to disc brakes brings about a significant enhancement in the overall braking performance of a vehicle. The superior design and functionality of disc brakes deliver numerous advantages that greatly improve the driving experience and safety.
One of the most noticeable improvements is the enhanced braking power. Disc brakes generate more friction compared to drum brakes, resulting in a shorter stopping distance. This translates to greater control and responsiveness during braking, especially in critical situations.
Furthermore, disc brakes provide improved stability during braking. The calipers grip the rotors evenly, distributing the braking force more evenly across the wheels. This prevents the vehicle from pulling to one side during braking, ensuring a straighter and more controlled stop.
Testimonials
“I had my Sterling 10.25 axle converted to disc brakes, and it’s like driving a whole new vehicle. The braking is so much better, I feel much safer on the road.”
John, satisfied customer
“The disc brake conversion on my Sterling 10.25 axle was one of the best upgrades I’ve made. The stopping power is incredible, and the vehicle handles much better.”
Mary, enthusiastic user
Comparison with Alternative Disc Brake Conversion Options
The Sterling 10.25 disc brake conversion is a popular option among enthusiasts, but it’s not the only one available. Several other kits offer different features and benefits. This table compares the Sterling 10.25 conversion with some of the most popular alternatives:
| Feature | Sterling 10.25 | Option 1 | Option 2 |
|---|---|---|---|
| Cost | $1,000-$1,500 | $800-$1,200 | $1,200-$1,800 |
| Compatibility | Ford 9-inch and Dana 60 axles | Ford 9-inch axles | Dana 60 axles |
| Ease of Installation | Moderate | Easy | Difficult |
| Performance | Excellent | Good | Very good |
Advantages and Disadvantages of Each Option
Sterling 10.25* Advantages:
High-quality components
Excellent performance
Moderate ease of installation
Disadvantages
More expensive than some alternatives
Not compatible with all axles
Option 1* Advantages:
Less expensive than the Sterling 10.25
Easy to install
Disadvantages
Not as high-quality components
If you’re in the market for a heavy-duty trailer axle with brakes, consider the 3500 lb trailer axle with brakes . This axle is designed to handle the demands of hauling heavy loads, and its brakes provide added safety and control.
For even greater load capacity and stability, the dexter 5200 lb torsion axle with brakes is an excellent choice. Its torsion suspension system offers a smooth ride and exceptional handling, making it ideal for demanding towing applications.
Not as good performance
Option 2* Advantages: Very good performance
Disadvantages
More expensive than the Sterling 10.25
Difficult to install
Not compatible with all axles
Troubleshooting and Maintenance for the Sterling 10.25 Disc Brake Conversion
To ensure optimal performance and longevity of your Sterling 10.25 disc brake conversion, it’s crucial to address potential issues and establish a maintenance schedule. This guide provides a troubleshooting guide for common problems and Artikels the necessary steps for keeping your disc brake system in top condition.
Troubleshooting Guide
After installing the disc brake conversion, you may encounter certain issues. Here’s a guide to help you identify and resolve them:
- Spongy or soft brake pedal:Air may have entered the brake lines. Bleed the brake system to remove the air and restore proper pedal feel.
- Brake pedal pulsation:Warped brake rotors can cause pulsation when braking. Replace the rotors to eliminate the issue.
- Leaking brake fluid:Inspect the brake lines, calipers, and master cylinder for leaks. Tighten loose connections or replace damaged components.
- Brake noise:Squealing or grinding noises may indicate worn brake pads or glazed rotors. Replace the brake pads and/or resurface the rotors to resolve the issue.
Maintenance Schedule
Regular maintenance is essential to keep your disc brake system functioning properly. Follow this schedule for optimal performance:
- Monthly:Inspect brake pads for wear. Check brake fluid level and top up if necessary.
- Every 6 months:Clean and lubricate caliper slide pins. Bleed the brake system to remove any air that may have accumulated.
- Annually:Inspect brake rotors for wear and replace if necessary. Check brake hoses for cracks or damage.
Last Recap
Embark on a journey of enhanced braking power, reduced stopping distances, and unwavering stability. The Sterling 10.25 disc brake conversion stands as a testament to innovation, offering a driving experience that is both safe and exhilarating. Experience the difference today and elevate your vehicle to new heights of performance.
Expert Answers
Is the Sterling 10.25 disc brake conversion compatible with my vehicle?
Compatibility varies depending on vehicle make, model, and year. Refer to the manufacturer’s website or consult a qualified mechanic for specific compatibility information.
How much does the conversion typically cost?
Conversion costs can vary based on factors such as the vehicle model, labor rates, and the specific kit chosen. Contact a reputable mechanic or performance shop for an accurate estimate.
Can I install the conversion myself?
While the conversion process is Artikeld in detail in this guide, it is highly recommended to seek professional installation to ensure proper functionality and safety. Disc brake systems require specialized knowledge and tools for proper installation and maintenance.
