Unveiling the intricacies of the diagram chevy rear drum brake assembly, this guide delves into the heart of your vehicle’s braking system. Embark on a journey of discovery, where knowledge and clarity converge to empower you with a profound understanding of this essential component.
From its fundamental purpose to its intricate design, we unravel the secrets of the Chevy rear drum brake assembly, providing a comprehensive overview that leaves no stone unturned.
Overview of Chevy Rear Drum Brake Assembly
A Chevy rear drum brake assembly is a critical component of the vehicle’s braking system, responsible for slowing down or stopping the vehicle by applying friction to the rotating wheels.
If you’re in the market for a trailer, consider upgrading to a 3500 lb trailer axle with brakes . This heavy-duty axle can handle the weight of your trailer and provide reliable braking power, ensuring a smooth and safe ride.
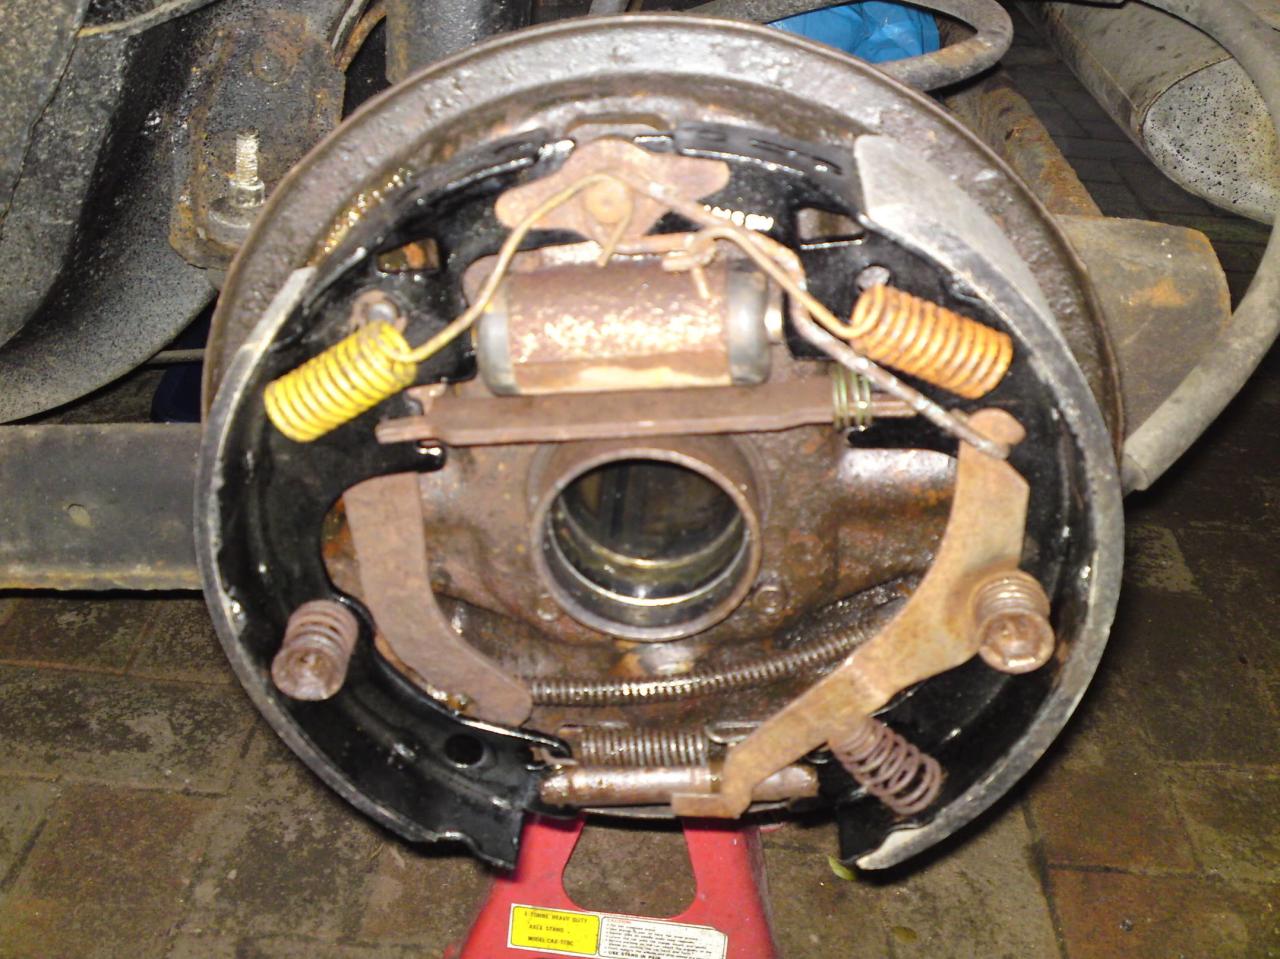
Chevy rear drum brake assemblies typically consist of the following components:
Brake drums:Cylindrical metal components that rotate with the wheels and provide the friction surface for the brake shoes.
Brake shoes:Curved metal components lined with friction material that press against the brake drums to create friction and slow down the vehicle.
Wheel cylinders:Hydraulic components that convert hydraulic pressure from the master cylinder into mechanical force to actuate the brake shoes.
Springs:Various types of springs that hold the brake shoes in place and return them to their original position after braking.
Adjusters:Mechanisms that automatically adjust the brake shoe clearance to maintain optimal braking performance.
Types of Rear Drum Brake Assemblies
Chevy vehicles may use different types of rear drum brake assemblies depending on the model, year, and specific requirements.
Duo-Servo Brakes:A type of brake assembly where both brake shoes are actuated by a single wheel cylinder. This design provides increased braking force but can be more prone to uneven wear.
Twin-Leading Shoe Brakes:A type of brake assembly where each brake shoe is actuated by its own wheel cylinder. This design provides more balanced braking and reduced wear.
Self-Adjusting Brakes:A type of brake assembly that incorporates an automatic adjuster to maintain optimal brake shoe clearance over time.
Disassembly Procedures
Disassembling a Chevy rear drum brake assembly is a relatively straightforward process, but it’s important to follow the proper steps and take safety precautions. Before you begin, gather the necessary tools, including a lug wrench, socket wrench, flathead screwdriver, and a hammer.
Once you have your tools, follow these steps to disassemble the drum brake assembly:
Safety Precautions
Park the vehicle on a level surface and engage the parking brake.
Chock the wheels opposite the brake assembly you’ll be working on.
Wear safety glasses and gloves to protect yourself from brake dust and metal shavings.
Remove the brake drum by pulling it straight off the axle.
Inspect the brake shoes for wear or damage. If the shoes are worn down to less than 1/4 inch, they need to be replaced.
Inspect the brake drums for cracks or damage. If the drums are damaged, they need to be replaced.
Remove the brake shoes by unhooking the return springs and removing the retaining clips.
Inspect the wheel cylinders for leaks or damage. If the wheel cylinders are leaking, they need to be replaced.
Inspect the brake lines for leaks or damage. If the brake lines are leaking, they need to be replaced.
Inspect the hardware for wear or damage. If the hardware is worn or damaged, it needs to be replaced.
Inspection and Diagnosis
Regularly inspecting and diagnosing your Chevy rear drum brake assembly is crucial for ensuring optimal braking performance and safety. Common issues can manifest as various symptoms, which serve as indicators of underlying problems. By understanding these signs and knowing how to diagnose them, you can promptly address any issues, preventing more severe problems down the road.
Common Issues and Signs of Wear
Here are some of the most common issues and signs of wear associated with Chevy rear drum brake assemblies:
Excessive brake pedal travel:This can indicate worn brake shoes, a faulty master cylinder, or air in the brake lines.
Spongy or soft brake pedal:This can be caused by worn brake pads, a leaking brake line, or a faulty master cylinder.
Grinding or squealing noises when braking:This is often a sign of worn brake pads or shoes, or a warped rotor.
Brake fade:This can occur when the brakes overheat, causing the brake fluid to boil and lose its effectiveness.
Uneven brake wear:This can be caused by a variety of factors, including misaligned wheels, worn suspension components, or a faulty brake caliper.
Identifying and Diagnosing Specific Problems
To accurately diagnose a problem with your Chevy rear drum brake assembly, it’s essential to identify the specific symptoms it’s exhibiting. Here’s a table summarizing the most common issues, their causes, and potential solutions:
Symptom
Cause
Solution
Excessive brake pedal travel
Worn brake shoes, faulty master cylinder, air in brake lines
Reassembling the Chevy rear drum brake assembly requires precision and attention to detail. Follow these steps to ensure proper functionality and safety:
Ensure that all components are thoroughly cleaned and inspected before reassembly. Replace any worn or damaged parts as necessary.
Installing the Brake Shoes
Position the brake shoes in the brake backing plate, ensuring the lining faces the drum.
Install the hold-down springs and pins to secure the brake shoes in place.
Tighten the hold-down spring bolts to the specified torque.
Adjusting the Brake Shoes
Proper adjustment is crucial for effective braking. Follow these steps:
Insert a brake adjusting tool into the star wheel adjuster hole.
Turn the star wheel adjuster clockwise until the brake shoes just make contact with the drum.
Back off the star wheel adjuster slightly until the drum spins freely without rubbing.
Repeat the adjustment for the other brake shoe.
Installing the Drum and Wheel Cylinder
Slide the brake drum over the brake shoes, ensuring it seats properly.
Install the wheel cylinder by aligning it with the brake shoes and securing it with bolts.
Tighten the wheel cylinder bolts to the specified torque.
Bleeding the Brakes
Bleeding the brakes is essential to remove any air from the system and ensure proper operation. Refer to the vehicle’s service manual for the correct bleeding procedure.
Torque Specifications
Hold-down spring bolts: 15-22 ft-lbs
Wheel cylinder bolts: 25-35 ft-lbs
Troubleshooting and Maintenance
Maintaining your Chevy rear drum brake assembly is crucial for optimal performance and safety. This section will delve into common troubleshooting tips and provide recommendations for regular maintenance and inspection intervals. Additionally, we’ll Artikel warning signs that indicate the need for professional repair.
Troubleshooting Tips
Spongy brake pedal:This issue could indicate air in the brake lines, a faulty master cylinder, or worn brake pads.
Grinding or squealing noises:These sounds may be caused by worn brake pads or a damaged rotor.
Brake pull:This problem, where the vehicle pulls to one side while braking, can result from uneven brake pad wear, a seized caliper, or a warped rotor.
Leaking brake fluid:A leak in the brake lines or a damaged master cylinder can lead to brake failure.
Regular Maintenance and Inspection
Regular maintenance and inspection are essential for preventing issues and ensuring the longevity of your Chevy rear drum brake assembly. Here’s a recommended schedule:
Monthly:Check brake fluid levels and visually inspect the brake pads for wear.
Every 6 months or 6,000 miles:Remove the brake drums and inspect the brake pads, shoes, and drums for wear or damage.
Every 2 years or 24,000 miles:Replace the brake shoes and hardware.
Warning Signs for Professional Repair
Severe vibration or pulsation when braking:This may indicate a warped rotor or a damaged wheel bearing.
Loss of braking power:This issue could be caused by a leak in the brake lines or a faulty master cylinder.
Brake pedal goes all the way to the floor:This problem may result from air in the brake lines or a failed master cylinder.
Loud grinding or scraping noises:These sounds may indicate severely worn brake pads or a damaged rotor.
Illustrations and Diagrams
Visual aids, such as illustrations and diagrams, are essential for understanding the assembly process of a Chevy rear drum brake assembly. They provide a clear representation of the components and their arrangement, making it easier to follow the assembly instructions and troubleshoot any issues that may arise.
The following illustrations and diagrams are provided to enhance your understanding of the Chevy rear drum brake assembly:
Exploded View of Chevy Rear Drum Brake Assembly
Exploded view of Chevy rear drum brake assembly
This exploded view provides a detailed representation of the components that make up the Chevy rear drum brake assembly. Each component is labeled for easy identification, including the brake shoes, brake drums, wheel cylinders, and return springs.
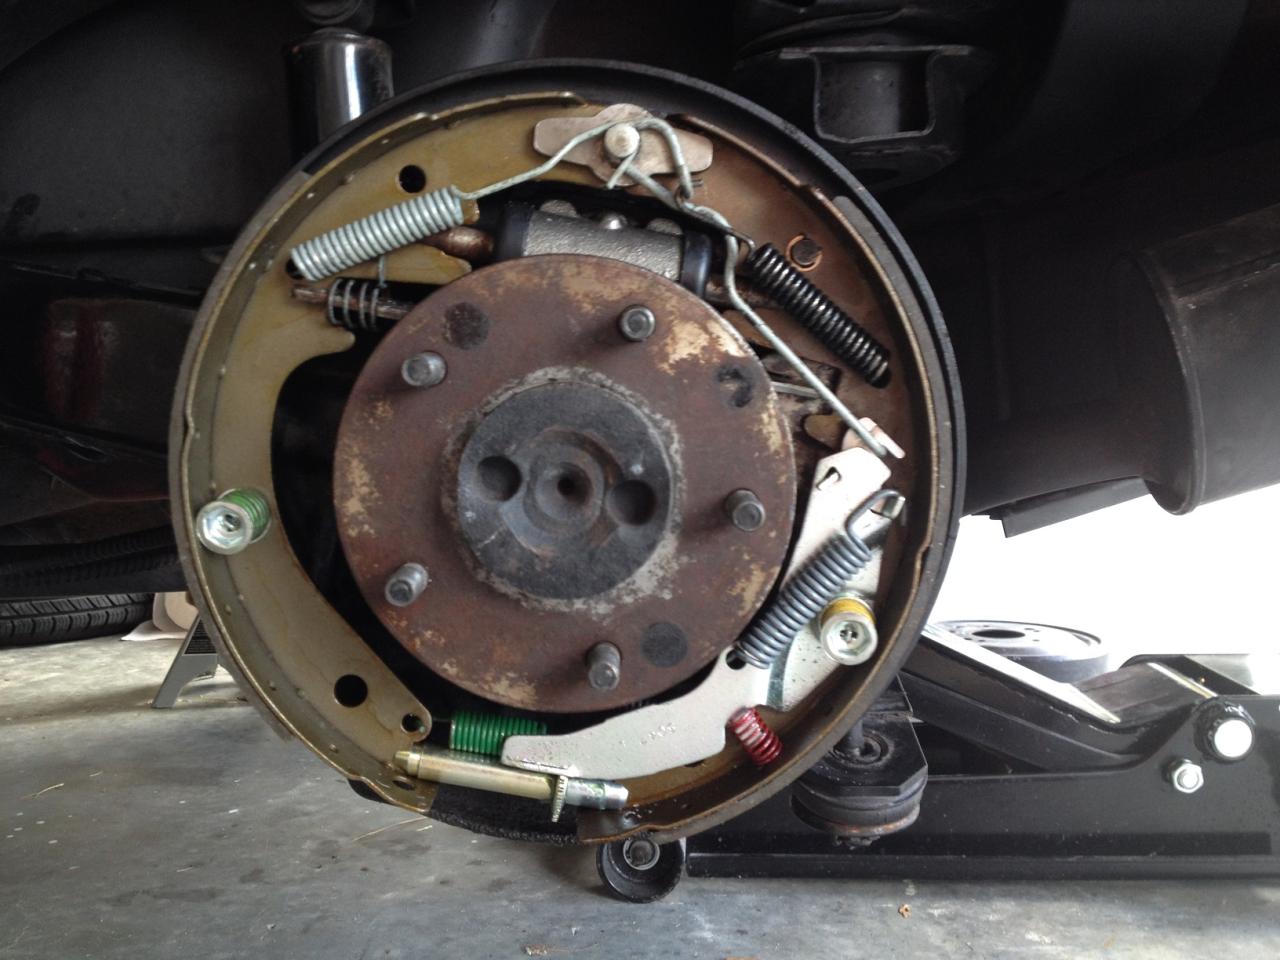
Cross-sectional View of Chevy Rear Drum Brake Assembly
Cross-sectional view of Chevy rear drum brake assembly
This cross-sectional view shows the internal workings of the Chevy rear drum brake assembly. It illustrates how the components interact with each other when the brake pedal is depressed, providing a better understanding of the assembly’s operation.
Wrap-Up
As we draw to a close, the diagram chevy rear drum brake assembly stands as a testament to the intricate interplay of automotive engineering and safety. Through this exploration, you have gained invaluable insights into its inner workings, empowering you to maintain and troubleshoot this vital system with confidence.
Questions and Answers: Diagram Chevy Rear Drum Brake Assembly
What are the common signs of a faulty Chevy rear drum brake assembly?
Squealing or grinding noises, reduced braking power, uneven brake wear, and a spongy brake pedal are all potential indicators of issues with the rear drum brake assembly.
How often should I inspect my Chevy rear drum brake assembly?
Regular inspections are crucial for ensuring optimal performance. Aim to inspect the assembly every 12,000 to 15,000 miles or as recommended in your vehicle’s maintenance schedule.
Can I replace the Chevy rear drum brake assembly myself?
While it is possible to replace the assembly yourself, it requires specialized knowledge and tools. For safety and accuracy, it is generally recommended to entrust this task to a qualified mechanic.