Ford 9 inch disc brake conversion – Embark on a transformative journey as we delve into the realm of Ford 9-inch disc brake conversion. This comprehensive guide will illuminate the advantages, components, and intricacies of this essential upgrade, empowering you to enhance your vehicle’s braking capabilities and elevate your driving experience to new heights.
From identifying the ideal conversion kit to navigating the intricacies of installation, we’ll guide you through each step with clarity and precision. Discover the secrets of selecting the optimal brake lines, master cylinder, and proportioning valve, ensuring seamless integration and optimal performance.
Introduction
The Ford 9-inch rear axle is a popular choice for classic car enthusiasts and hot rodders alike. It is a strong and durable axle that can handle a lot of power. One of the most popular upgrades for the Ford 9-inch axle is to convert it to disc brakes.
Disc brakes offer a number of advantages over drum brakes. They are more efficient at stopping the car, they are less likely to fade, and they are easier to maintain.
Advantages of Disc Brakes
- More efficient at stopping the car
- Less likely to fade
- Easier to maintain
Disadvantages of Disc Brakes
- More expensive than drum brakes
- Can be more difficult to install
- May require new wheels and tires
Conversion Kits
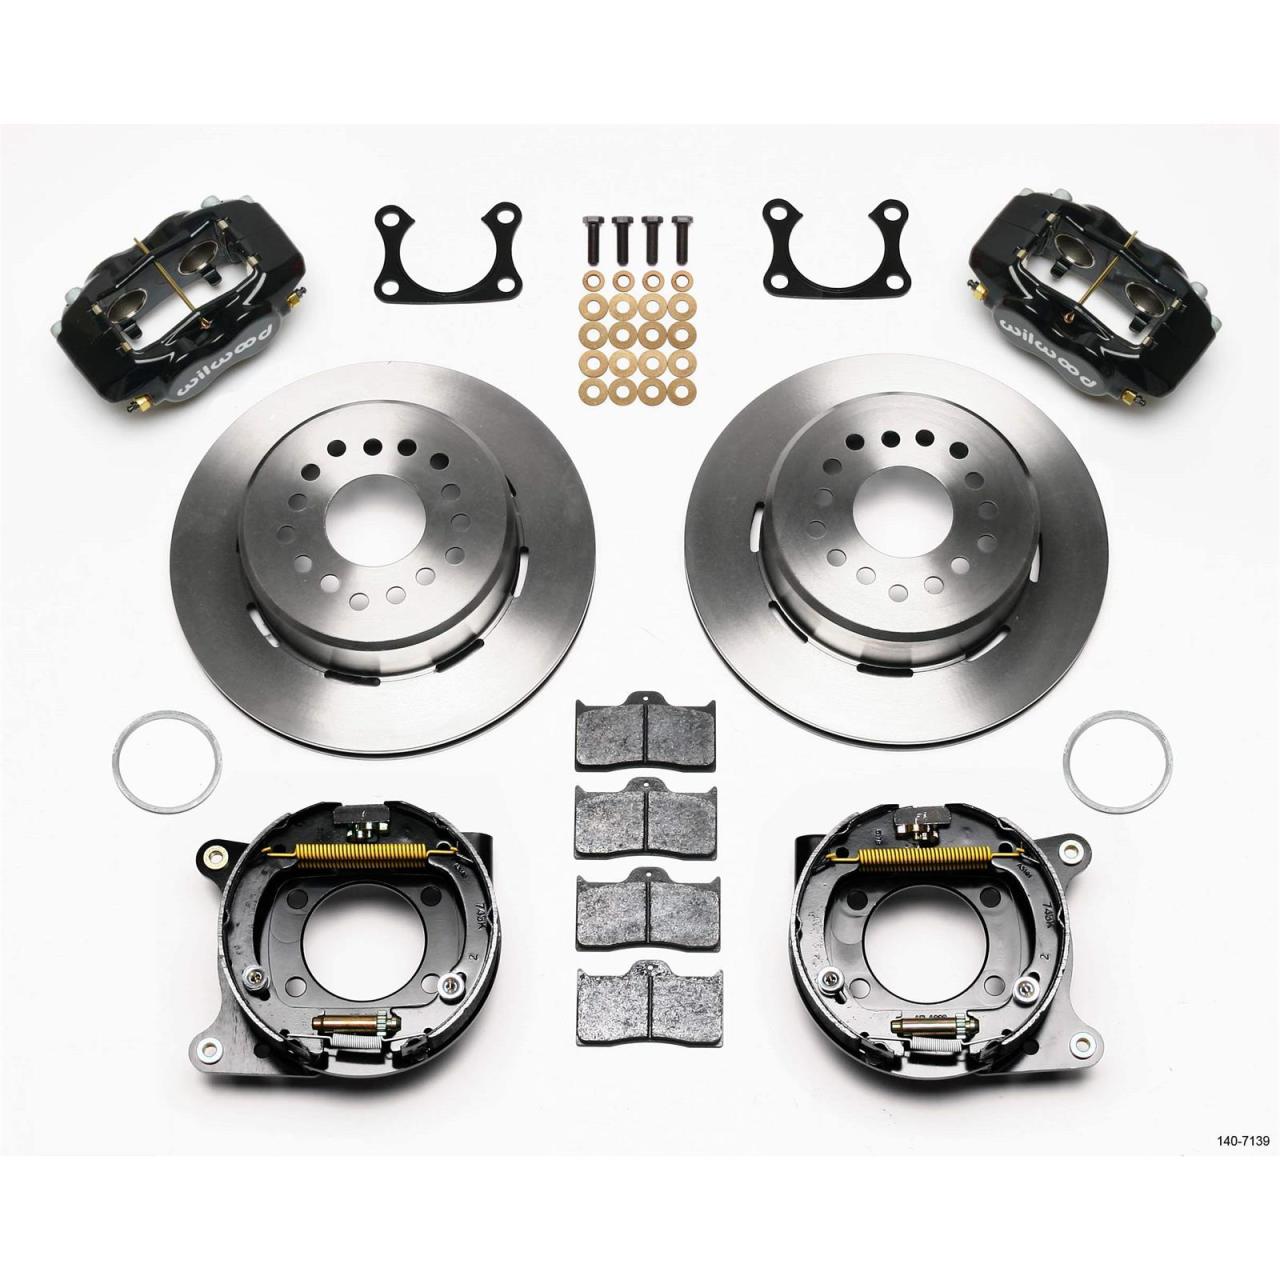
Converting a Ford 9-inch axle to disc brakes offers several advantages, including improved braking performance, reduced unsprung weight, and enhanced aesthetics. To facilitate this conversion, various types of disc brake conversion kits are available, catering to specific axle configurations and preferences.
Bolt-On Kits
Bolt-on disc brake conversion kits are designed for direct compatibility with the existing axle housing. These kits typically include calipers, rotors, brackets, and all necessary hardware. They offer a straightforward installation process, as no welding or fabrication is required. However, bolt-on kits may have limited compatibility with certain axle configurations and may not provide the same level of customization as other options.
Weld-On Kits
Weld-on disc brake conversion kits provide greater flexibility and customization options. These kits include calipers, rotors, and brackets that require welding to the axle housing. They allow for precise positioning of the calipers and rotors, ensuring optimal braking performance. Weld-on kits are ideal for applications where custom axle configurations or specific caliper placements are desired.
Hub Conversion Kits
Hub conversion kits replace the original axle hubs with integrated disc brake assemblies. These kits provide a complete braking system, including calipers, rotors, bearings, and seals. Hub conversion kits offer the advantage of eliminating the need for separate brackets and welding, simplifying the installation process.
However, they may require modification to the axle housing and may not be compatible with all axle configurations.
Component Kits
Component kits offer the most flexibility and customization options. These kits include individual components, such as calipers, rotors, brackets, and hardware, allowing for custom tailoring of the disc brake conversion to specific axle configurations and performance requirements. Component kits provide the greatest degree of customization but require more fabrication and assembly expertise.
Installation: Ford 9 Inch Disc Brake Conversion
Installing a disc brake conversion kit on a Ford 9-inch axle is a straightforward process that can be completed in a few hours. Here’s a step-by-step guide to help you through the installation:
Before you begin, gather all the necessary tools and parts. You will need a jack, jack stands, lug wrench, socket wrench, torque wrench, and the disc brake conversion kit. Once you have everything you need, follow these steps:
Removing the Old Drum Brakes
1. Safety first! Park your car on a level surface and engage the parking brake.
2. Loosen the lug nuts on the rear wheels, but do not remove them completely.
3. Jack up the rear of the car and place jack stands under the frame.
4. Remove the lug nuts and wheels.
5. Remove the brake drum by pulling it straight off the axle.
6. Remove the brake shoes and springs.
7. Remove the wheel cylinder by unbolting it from the backing plate.
Preparing the Axle
1. Clean the axle housing and backing plate to remove any dirt or debris.
2. Install the new axle bearings and seals according to the manufacturer’s instructions.
3. Install the new backing plates onto the axle housing.
Mounting the New Disc Brake Components
1. Install the new brake rotors onto the axle.
2. Install the new brake calipers onto the backing plates.
3. Install the new brake pads into the calipers.
4. Connect the brake hoses to the calipers.
5. Bleed the brake system to remove any air from the lines.
6. Install the wheels and lug nuts.
7. Lower the car to the ground and tighten the lug nuts to the specified torque.
Congratulations! You have now successfully installed a disc brake conversion kit on your Ford 9-inch axle. Test drive the car to ensure that the brakes are working properly.
Brake Lines and Hoses
Brake lines and hoses are crucial components of a disc brake conversion, as they transport brake fluid from the master cylinder to the calipers. There are two main types of brake lines: rigid lines and flexible hoses.
Rigid brake lines are made of steel and are used to connect the master cylinder to the flexible hoses. They are more durable and less likely to fail than flexible hoses, but they are also more difficult to install.
Flexible hoses are made of rubber and are used to connect the rigid lines to the calipers. They are more flexible than rigid lines, which makes them easier to install, but they are also more likely to fail.
Selecting the Correct Brake Lines and Hoses
When selecting brake lines and hoses for a Ford 9-inch axle, it is important to consider the following factors:
- The type of brake system being installed (single or dual circuit)
- The size of the brake calipers
- The length of the brake lines
- The type of fluid being used (DOT 3, DOT 4, or DOT 5)
Once you have considered these factors, you can select the correct brake lines and hoses for your specific application.
Master Cylinder and Booster
In a disc brake system, the master cylinder and brake booster play crucial roles in converting the driver’s foot force into hydraulic pressure that actuates the brake calipers.
The master cylinder is a cylindrical reservoir that houses a piston. When the driver presses the brake pedal, the piston compresses the brake fluid, creating hydraulic pressure. This pressure is then transmitted through brake lines to the brake calipers, which in turn apply pressure to the brake pads against the rotors to slow down or stop the vehicle.
Types of Master Cylinders, Ford 9 inch disc brake conversion
There are two main types of master cylinders used in Ford 9-inch axle disc brake conversions:
- Single-reservoir master cylinder:This type of master cylinder has a single reservoir that holds both the front and rear brake fluid. It is typically used in older vehicles with drum brakes on the rear axle.
- Dual-reservoir master cylinder:This type of master cylinder has two separate reservoirs, one for the front brakes and one for the rear brakes. It is typically used in newer vehicles with disc brakes on all four wheels.
Brake Boosters
A brake booster is a device that assists the driver in applying force to the brake pedal. It does this by using vacuum or hydraulic pressure to multiply the force applied by the driver’s foot.
There are two main types of brake boosters used in Ford 9-inch axle disc brake conversions:
- Vacuum brake booster:This type of brake booster uses vacuum from the engine to assist the driver in applying force to the brake pedal. It is typically used in older vehicles with carburetor engines.
- Hydraulic brake booster:This type of brake booster uses hydraulic pressure from the power steering pump to assist the driver in applying force to the brake pedal. It is typically used in newer vehicles with fuel-injected engines.
Proportioning Valve
A proportioning valve is a critical component in a disc brake system that ensures optimal braking performance by regulating the hydraulic pressure distribution between the front and rear brakes.
In a Ford 9-inch axle disc brake conversion, the proportioning valve plays a vital role in preventing rear wheel lock-up during braking, which can lead to loss of control and potential accidents.
Selecting and Installing a Proportioning Valve
Selecting the appropriate proportioning valve for your Ford 9-inch axle disc brake conversion depends on the specific vehicle and brake system configuration.
- Adjustable vs. Non-Adjustable:Adjustable proportioning valves allow for fine-tuning of the pressure distribution, while non-adjustable valves provide a fixed ratio.
- Line Pressure:The proportioning valve should be compatible with the line pressure generated by your master cylinder.
- Mounting Location:Proportioning valves are typically mounted on the vehicle’s frame or firewall, ensuring proper clearance from other components.
Once the proportioning valve is selected, it should be installed according to the manufacturer’s instructions:
- Connect the input port to the master cylinder outlet.
- Connect the output ports to the front and rear brake lines.
- Adjust the valve (if adjustable) to achieve the desired pressure distribution.
Bleeding the Brakes
Bleeding the brakes is a crucial step after a disc brake conversion to ensure optimal braking performance. Air trapped within the brake lines can lead to spongy or ineffective brakes, compromising safety.
Step-by-Step Guide for Bleeding Brakes on a Ford 9-Inch Axle with Disc Brakes
1.
-
-*Gather Necessary Tools and Materials
Collect a brake bleeder wrench, clear tubing, a wrench, and DOT 3 or DOT 4 brake fluid.
- 2.
- 3.
- 4.
- 5.
- 6.
- 7.
-*Prepare the Bleeder Valve
Locate the bleeder valve on the caliper and clean any dirt or debris around it. Attach the clear tubing to the valve.
-*Open the Bleeder Valve and Fill the Reservoir
Have an assistant slowly depress the brake pedal while you open the bleeder valve slightly. Monitor the brake fluid level in the master cylinder and top it up as needed.
-*Close the Bleeder Valve and Release the Pedal
Once brake fluid flows out of the tube without any air bubbles, close the bleeder valve. The assistant should then release the brake pedal.
-*Repeat the Process
Repeat steps 3 and 4 for each caliper, starting with the furthest one from the master cylinder and working your way inward.
-*Tighten the Bleeder Valves and Check Fluid Level
After bleeding all calipers, tighten the bleeder valves and recheck the brake fluid level in the master cylinder.
-*Test the Brakes
Start the engine and pump the brake pedal several times to build pressure. If the pedal feels firm and responsive, the bleeding process is complete.
Troubleshooting
After completing a disc brake conversion on a Ford 9-inch axle, it’s essential to troubleshoot any potential issues that may arise. Here are some common problems and solutions to consider:
Brake Pedal Feel
Problem:Spongy or soft brake pedal.
Solution:
- Check for air in the brake lines and bleed the system thoroughly.
- Inspect the master cylinder for leaks or damage and replace if necessary.
- Ensure the brake pads are properly seated and not worn out.
Brakes Pulling to One Side
Problem:The vehicle pulls to one side when braking.
Solution:
- Check the brake caliper mounting brackets for proper alignment and tighten any loose bolts.
- Inspect the brake pads for uneven wear and replace if necessary.
- Ensure the brake hoses are not kinked or damaged and replace if needed.
Brake Noise
Problem:Excessive brake noise, such as squealing or grinding.
Solution:
- Check the brake pads for wear and replace if necessary.
- Lubricate the brake caliper slides and pins to reduce friction.
- Inspect the brake rotors for warping or damage and replace if needed.
Closure
As you complete your Ford 9-inch disc brake conversion, you’ll not only enhance your vehicle’s safety but also elevate its overall driving dynamics. Experience the confidence that comes with superior stopping power and the satisfaction of a project well executed.
Let this guide be your trusted companion on this transformative journey, empowering you to tackle the conversion with knowledge and precision.
Quick FAQs
What are the benefits of converting to disc brakes on a Ford 9-inch axle?
Disc brakes provide superior stopping power, reduced fade, and improved heat dissipation compared to drum brakes.
What factors should I consider when selecting a disc brake conversion kit?
Consider the axle configuration, brake rotor size, caliper type, and compatibility with your vehicle’s suspension and wheels.
How do I ensure proper bleeding of the brakes after a disc brake conversion?
Follow a systematic bleeding procedure, starting from the caliper furthest from the master cylinder and working your way towards the closest caliper.
